Stone and masonry repairs

1596652249784_IMG_20191101_213819

IMG_20191028_125012

1596652265656_1596652254330_IMG_20191101_213622

PicsArt_08-05-07.57.04

IMG_20191104_101005

PicsArt_08-05-07.39.05

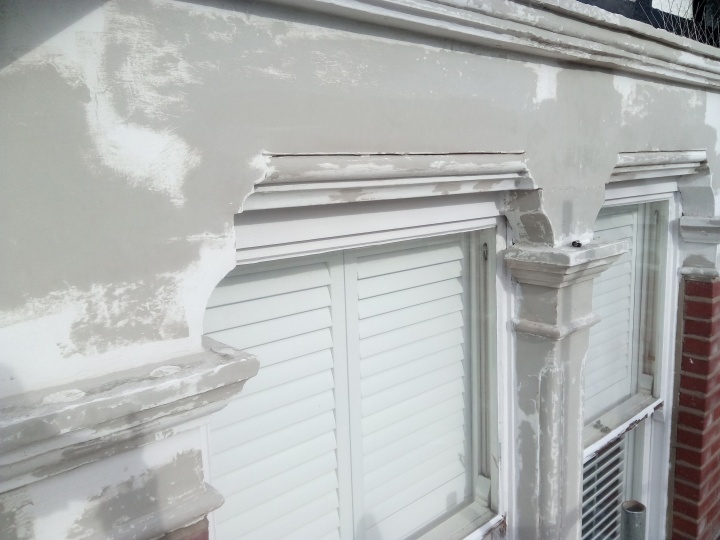
The stone was scraped off to remove the old flaking paint. Cracked joints in the stone work were opened up and cleaned out and all the stone work was rubbed down to flatten the surface before filling. Some of the stone work had deteriorated with age and had lost its shape. To fill, repair and to reshape the damaged stone I used a specialist masonry repair filler called Toupretlith. Once the toupret was dry and had been rubbed down I applied a coat of stabiliser to all the filled areas to strengthen the repair.  To finish the stone work I applied two coats of Dulux trade all seasons masonry paint.

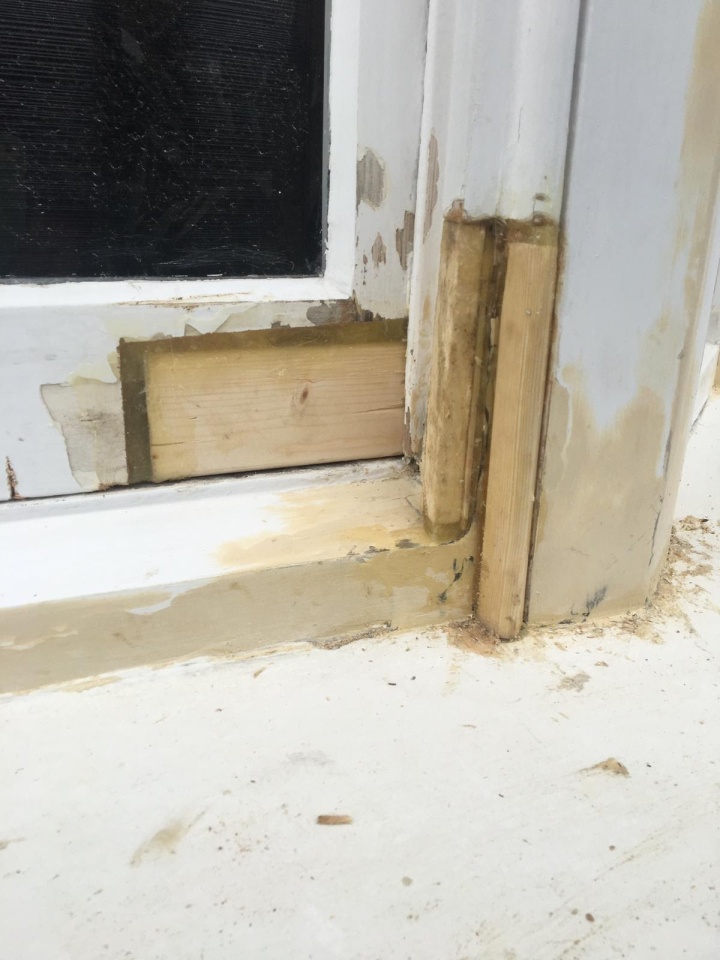
The sashes were scraped off and thoroughly rubbed down to remove any loose paint and putties. With all the loose material removed I applied the first undercoat, I used a Dulux trade weathershield undercoat.

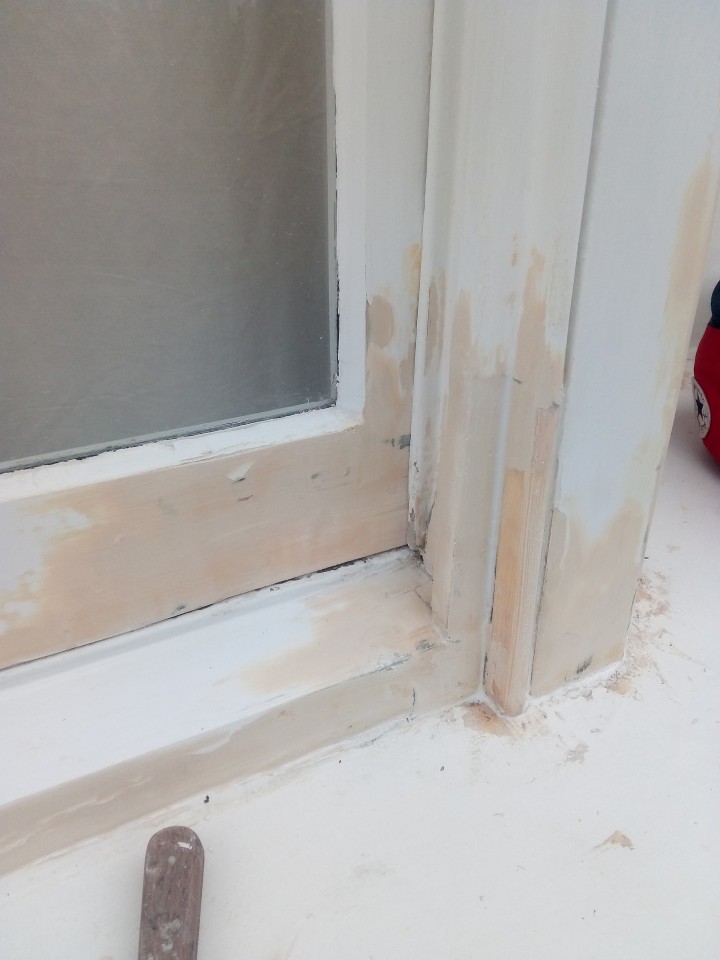
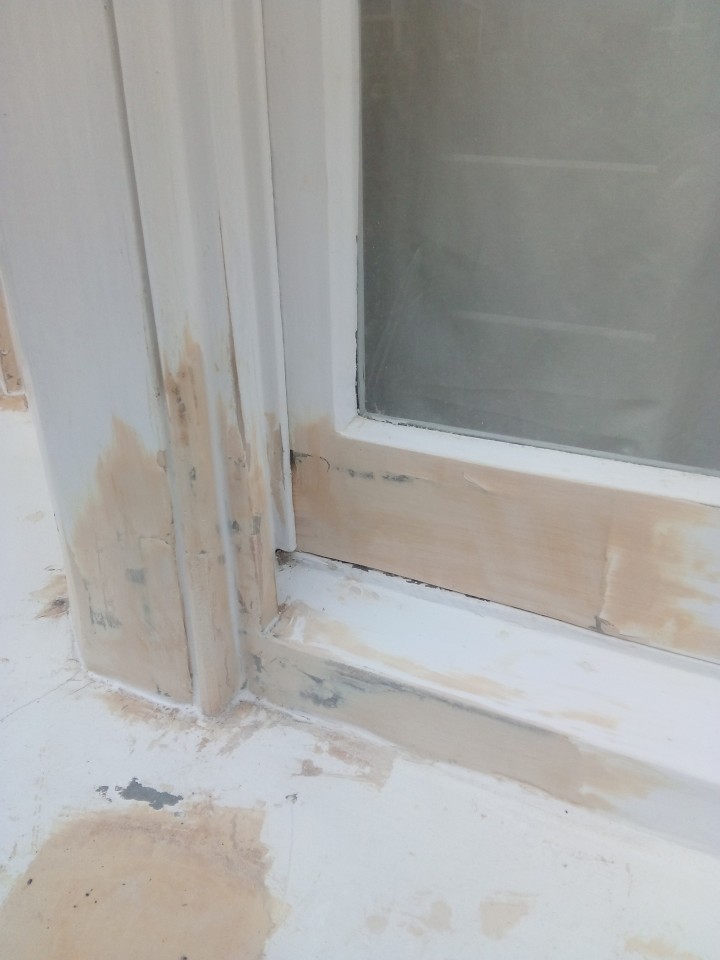
Any defects in the wood work were filled using a two pack wood filler and using linseed oil putty I replaced the missing putties.

After filling the windows were give another thorough rub down before applying the second undercoat. To finish the windows were buffed with a fine paper before applying a coat of Dulux trade weathershield gloss.


Repair care

IMG_20191005_115854IMG-20191126-WA0024IMG-20191126-WA0022IMG-20191126-WA0011IMG_20191128_090648IMG_20191128_090643image-8

This sash had wet rot in the lower sashes conservation joints. Generally the worse of the rot and weather damage will appear at the bottom of the window. when it rains the water runs down the windows and thus the bottom of the window takes the brunt of it. The joints are prone to opening due to movement so ideally constant maintenance is needed to keep old sashes in tip top condition. Small cracks in the joints and the bottom putties left unchecked will develop into bigger problems.

With wet rot scraping off and digging out the the damaged/rotten wood the best you can and applying a wood hardener isn’t sufficient if you want the repair to last. To be sure I had removed all trace of the rot I cut a piece of the window out, cutting around the rotten patch into the good wood to be sure that no seed of rot could be left behind.

With the rot removed I applied Repair care’s two pack wood hardener to the freshly cut wood on the window before piecing in a fresh bit of wood. I set the wood in place using Repair care’s two pack resin.

To finish the repair I used Repair care’s spot repair filler to create a smooth finish

The Repair care range of products are expensive but for anybody wishing to maintain original sash windows or any original woodwork which has suffered with time this product is a must.

Once the repair care was finished with I applied two Dulux trade undercoats to seal the surface followed by a coat of Dulux trade weathershield gloss for ultimate protection.


Heres one I done earlier (fourteen months later)

0_PicsArt_02-24-05.22.271_PicsArt_02-24-05.19.57

I decorated this exterior in December 2018. I passed by the property this week and was pleased to see its still looking good, there’s no cracks or flaking, the paint has held up really well so far (credit to Dulux)

I  thought I’d post this to show that with good preparation and good quality materials you can achieve a lasting finish.


Double parlor

IMG_20190709_104215

IMG_20190709_090949

IMG_20190730_110434

IMG_20190730_135026

IMG_20190731_092829

IMG_20190801_131319

IMG_20190719_151202

IMG_20190726_132531

IMG-20190731-WA0004

IMG_20190805_112240

IMG_20190903_144620

IMG_20190805_112246

IMG_20190903_113915

The old wallpaper was stripped using a steamer, once all the paper was removed I rubbed down the walls all over, taking out any loose plaster and opening up any cracks. I wanted to be sure the cracks wouldn’t reappear so I opened them up, fibre tape was put inside the crack and it was plastered over, then taped and jointed to finish the crack. 

There were a few patches of loose plaster to repair, they were hacked off back to brick then rendered, bonded and skimmed to make the wall good again. The ceilings were artexed, I scraped off the artex all over and plastered the ceilings to give a smooth finish.

When all the repairs and plaster work were complete I applied a first coat of paint to the new plastered ceiling, I used a white dulux trade vinyl matt emulsion mixed with water 50/50 to make a miscoat, a first coat to soak right into the new plaster. To finish the ceilings I applied two full coats of white Dulux Trade vinyl matt emulsion.

The walls were cross lined. Before hanging the paper all the walls need to be sized, using cellulose paste I gave the entire walls a coat to create an evenly porous surface, this allows me to slip and slide the paper around the wall properly. To finish the walls I applied a coat of Dulux trade vinyl matt emulsion in the desired colours, after the first coat the walls were filled and touched up before being finished with two further coats.

The woodwork was rubbed down and undercoated with a dulux trade undercoat. After the first undercoat any defects in the woodwork were filled using ronseals two pack wood filler before being rubbed down and having a second undercoat applied. To finish the woodwork was buffed with a finer paper before applying a  top coat of dulux trade high gloss.

The radiators in the room were removed while work took place, plaster repairs were made and the walls were finished properly before putting the radiators back on the walls. The rads were given a good rub down before applying a coat of zinsser, I finished them with two coats of Johnstones radiator paint.

The wooden window sills were stripped back to bare wood and finished with Danish oil.

Victorian terrace, “Marguerite villas”

IMG_20190902_213244

IMG_20190819_142215

IMG_20190819_142202

IMG_20190819_142259

IMG_20190819_142241

IMG_20190822_174436

IMG_20190822_174442

IMG_20190822_174455

Name plaques on Victorian properties are common and an original feature. Plaques naming the house as “terrace”, “cottage” or “villa” were often used to portray the size or the quality of the development. The names on the plaque were often but not always a tribute to the land owners family.

All the masonry on this property was scraped off, rubbed down and burnt off in patches where necessary.

With all the loose paint and debris scraped off I applied a stabilizer to any bare stone to strengthen the surface before filling. I use a specialist masonry repair filler called Toupretlith to fill and shape up the damaged stone work.

When all the repairs to the stone had been made I applied another coat of stabiliser to all the patches of filler to strengthen the filler and help it bind to the stone.

To finish I applied two coats of white Dulux Trade all season’s masonry paint.

The front wall and the bricks surrounding the porch were treated the same as the stone work, finished with the same paint only it was mixed to a colour chosen by the client.

The fascia and gutters, downpipe and the front gate were scraped off and rubbed down before being undercoated with a dark grey dulux trade undercoat, they were finished with a coat of Dulux trade black weathershied gloss.

New (newish) build appartment

IMG_20190905_214944

IMG_20190905_214509

IMG_20190905_214137

IMG_20190905_215119

IMG_20190905_215032

IMG_20190905_214816

IMG_20190905_215407

This appartment was up in the sky and had a fantastic view over London.

The walls were rubbed down entirely and any defects were filled using gypsum filler. The ceilings and walls were finished with two coats of Dulux trade vinyl matt emulsion.

The woodwork was thoroughly rubbed down and any defects were filled using ronseals two pack wood filler before finishing with two coats of Dulux trade satinwood.

Not my usual

IMG_8590

IMG_8586

2019-03-08 11.21.06

2019-03-08 11.18.23

This isn’t my usual line of work but it was an interesting job and i wanted to share it with everyone bacause I think this bike looks amazing now.

The frame was in a bit of a mess, I gave it all a light rub down and a clean before applying over 1100 individual Spiderman stickers. I cut the stickers into the edges as I would wallpaper. The yellow bits on the bikes frame are original and were on the bike before, I left them untouched, cutting the stickers into them. Once the entire frame was covered I used a waterproof pva to coat all the stickers and keep them all held down. To seal the stickers and protect them from the weather I applied three coats of Dulux Trade yacht varnish, being careful to ensure I sealed the stickers all over completely.

So if anyone else wants a Spiderman bike you know where to come 😉


Natural wood finishes

2019-03-04 18.45.542019-03-04 18.49.12

2019-03-04 18.49.452019-03-04 18.51.30

The existing varnish was cracking and peeling, it can’t be rubbed down and simply recoated when it’s like this, to get a nice even finish again the wood needs to be stripped back to bare. I used nitro mors to remove the existing coats of varnish then gave the door a thorough rub down.

I used a Cuprinol wood filler matched to the colour of the wood to fill any blemishes before applying the first coat of Dulux Trade ultimate woodstain. The first coat raises the grain of the wood so between coats a light rub down was needed, I used a fine grade paper, 240grit to buff the wood before finishing with the second coat.

Paper hanging

2019-03-04 18.34.30

2019-03-04 18.38.31

2019-03-04 18.39.41

2019-03-04 18.43.15

2019-03-04 18.44.11

This was a lovely house to work in and a lovely family to work around. The man in this house would make me a hot sandwich for lunch and if he was out he would bring me back pie’n mash 😊 it dont get better than that.

Before any paper could be hung the rest of the decorating needed completed.

The ceilings and walls were rubbed down all over removing any lumps’n bumps, any cracks were opened up and raked out to allow filler to get right into the cracks rather than simply filling over the top of them, which wouldn’t last 5 minutes before cracking again. I used a gyproc filler to fill and skim any defects to the plaster work. I used a white Dulux Trade vinyl matt to paint the ceilings, a thinned down first coat to seal the filler followed by two full coats.

I used the thinned out white emulsion to seal the filler to the walls below the dado aswel. To finish the lower walls I applied two coats of Little Greene intelligent matt emulsion

The dado, skirtings and door frames were thoroughly rubbed down, any defects were filled using Ronseals two pack wood filler and any bare wood and filler was touched up with a dulux trade wood primer before finishing with two coats of Dulux Trade oil eggshell, lightly buffed up between coats. The eggshell its self is self undercoating so there’s no need for an undercoat unless your finishing bare wood or unless a lot of preparation has been necessary.

The doors were rubbed down and finished with Danish oil buffed into the wood with a lint free cloth.

With all the painting out the way I could begin papering. The paper was supplied by a company called . Before papering I mixed up a Solvite paste and used it to size/coat the walls that were to be papered, sealing the wall, creating even porosity all over so the paper will move around easily while I’m hanging it. When hanging the paper I used a tub paste, tub pastes are a lot stronger than solvite pastes and are usually required for sticking finish papers. With the paper hung it was job complete.

Edwardian interior

p1020165

p1020178

p1020168

p1020174

p1020173

p1020175

p1020148

p1020154

p1020150

p1020161

p1020162

p1020157

Before any painting could take place and before any papers were hung a lot of preparation was needed. Any old wallpapers were stripped and the ceilings and walls throughout the house were rubbed down and filled using a gyproc plaster based filler.

All the ceilings were finished with two coats of white Dulux trade vinyl matt, the walls throughout were finished with two coats of Little Greene intelligent matt emulsion.

The woodwork was thoroughly rubbed down, filled using two pack wood filler and caulked where necessary. I finished the woodwork with two coats of Dulux trade oil eggshell, giving a fine rub down between coats. All the bare wood was rubbed down and finished with Danish oil buffed in with a lint free cloth.

Once all the painting was complete the wallpapers could be hung, the papers were from Harlequin. A few were wide vinyls, with this type of paper the paste is applied to the wall rather than the paper. I used a solvite tub paste to stick the papers because it’s a lot stronger than cellulose paste which you mix yourself.